Image Processing Filters
We touched on high-pass and low-pass filters in the Image Processing Basics section. Here we go into more detail on more advanced filters such as unsharp masking, low-pass filtering for noise removal, and filters for reducing image artifacts.
Unsharp Mask Filter
Unsharp masking is a technique originally used in the photographic darkroom. It was popularized in the astrophotography world by David Malin of the Anglo-Australian Observatory. The use of this filter is the source of some controversy as some people like the results and some do not. It is probably safe to say that the improper or excessive use of unsharp masking can lead to displeasing results, but to each his own....
Digital unsharp masking filters simulate the effect of the true photographic technique. It is possible to more accurately recreate the original darkroom technique using computers (see below). True unsharp masking involves creating a blurred version of the image and then subtracting this from the original. The result is a sharper, more detailed image.
Subtle application tends to do a very good job of sharpening an image. Using an automatic unsharp filter is a highly recommended technique to gain back some sharpness when resizing an image to a smaller format for web display or when making thumbnail images for a website. In this case, software provides the user with control over the strength of the effect.
Stronger filtering, when properly used, can have dramatic results. The level of detail visible in a nebula, for example, can be incredible after being unsharp masked. However, improper application of the filter can lead to a noisy, overprocessed-looking image. The most obvious artifact are the dreaded black halos. Overprocessed images often show black halos around bright stars (or even fainter stars in extreme cases). In the blurred version of the image (the mask), the stars are larger than in the original because the blurring tends to smear out the stars. When subtracted from the original, the larger blurred stars leave dark circles around the smaller original stars.
The Old-Fashioned Way
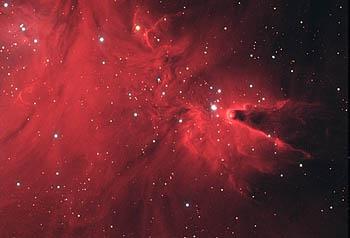
It is possible to have more control over the unsharp masking technique by creating an actual mask and subtracting it from the original image. This is especially good for situations where you might want extreme amounts of enhancement without the artifacts associated with heavy application of automatic unsharp mask filters. Take, for example, this perfectly good image of the Cone Nebula. We'll ruin it in the interest of science and see if we can't improve on the unsharp mask filter.

Above: An image of the Cone Nebula, which necessarily is not in need of enhancement, but that won't stop us.
Running a strong unsharp mask routine enhances the contrast between bright and dark regions of nebulosity. The result is dramatic, showing clearly the intricate structure of the gas clouds. However, blue haloes have appeared around the bright stars, and the brightest regions of the nebula are nearly saturated, causing detail to be lost in these areas.

Above: Running an extreme unsharp mask filter on the Cone Nebula image.
Instead of using the software filter to simulate the effect of an unsharp mask, it is possible instead to reproduce the actual photographic process digitally. The term unsharp mask refers to the use of a blurred version of the image which is subtracted from the original. To create this blurred image, begin by duplicating the original picture (since you will need the original again later). Use a low-pass filter to blur the image. The Gaussian Blur function of many programs (including Adobe Photoshop, which was used for this example) works very well. The blur strength should be set fairly high. Use the software adjustments to lower the contrast and brightness. This will affect the final image, so some experimentation may be necessary. In the image below the brightness was lowered 20% and the contrast lowered 50%.

Above: A Gaussian blur filter produces the unsharp mask.
In Photoshop, use the Clone tool (or Healing Brush tool) to remove the brighter stars from the mask. See the Photoshop pages of the Software Instructions section for more details. Next, the mask must be subtracted from the original image. To do this in Photoshop, copy the mask, paste it into a new layer above the original, and select Difference from the pull-down menu in the Layers window. The brightness and contrast will now have to be raised again, but not nearly as much as they were lowered for the mask.
Tip: If using Photoshop for this, you can duplicate the original as a new layer and create the mask there without having to paste a separate image.
The new image shows the same enhanced detail in the dimmer portions of the nebula, but now also shows more detail in the bright regions since these are not saturated now. Also, the halo effect has been minimized because we were able to remove the stars from the mask image.

Above: The final image after "true" unsharp masking technique has been applied.

