
Color Imaging
Most astronomical CCD cameras create color images by combining black and white images taken through red, green, and blue filters. In theBasics of Taking CCD Images section we gave the example of the Trifid Nebula, M20, imaged using this technique. We ended up with three image files, one for each color. After processing these images using the previous techniques of calibration and stacking, we are ready to combine them to create a full color image.
To combine the images they must be aligned with each other. Some software packages allow you to align the images first and then combine them, while others combine the images first and then allow you to shift the images as necessary to align them. CCDOPS, included with the popular CCD cameras from SBIG is in the latter category so we will use that method here. The basic ideas are the same for any program, and other color-combining techniques are covered under Advanced Image Processing. See the Software Instructions section for specific details on color combining with CCDOPS, MaxIm DL, and Photoshop.
In CCDOPS, the images -- called color components -- are saved with file extensions for each color. It is also possible to combine files taken with other programs or files saved in other formats. Selecting the RGB Combine function opens a window in which you are instructed to select the file you wish to combine. If using the SBIG color component format, simply selecting the .R component file is sufficient. The green and blue files are automatically filled in. The RGB Combine window should then look as follows:

The columns at right are for shifting each image to register it with the others during the alignment portion of the procedure. First, we must combine the images. We do this by clicking Do It in the window. This should combine the images into a color image. However, the images will not likely line up at this point and an image like the one below will be produced.

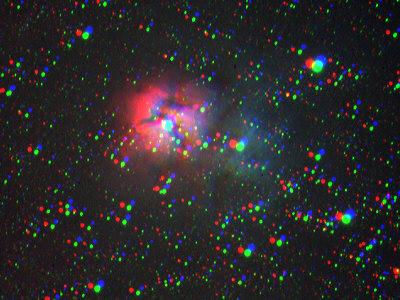
Above: Trifid Nebula image before alignment. Notice the red, green, and blue images do not line up properly.
It can easily be seen from the image which direction each color component must be moved to line up with the others. For example, in the image above, the red component needs to be shifted to the right and down slightly in order to line up with the green component. The blue image must be shifted a down and a bit left to align with the green. This is accomplished by entering the appropriate numbers into the boxes in the RGB Combine window. It make take several attempts to align the images perfectly. In the end, for our example files the following adjustments were made:

Above: The RGB Combine window showing the adjustments made to align the color images of the Trifid Nebula. Notice that + or - indicates which direction the color component if shifted.
The result is a full color image of the Trifid Nebula!
